

Background / Catching Up
Over the last few months, those of you who follow my ramblings here have probably noticed a serious lack of content (4 months!). When I started this project I wanted to try to post something once a month and managed to stay true to that goal up until recently, hopefully, this post will explain why. Sometime in May, I was contacted by Hackaday to work on a course for their Hackaday-U program, which is a program designed to offer free training and courses regarding all things technology. I like what Hackaday is doing with Hackaday-U and have been a long time Hackaday fan so this was something that I wanted to pursue. I spent the majority of the early days of my career pouring over free materials that people had posted online and wanted to give back to a community that has helped me learn so much over the years. A site that comes to mind is opensecuritytraining.info - I learned so much from that site and if you’ve not looked at it before, definitely check it out! Lastly - if this training sounds interesting to you and you would like to take a more advanced private course, check out VoidStar where I offer training based on a lot of the topics you’ve seen on this site!
Next, I needed to decide a couple of things:
- What do I want to teach?
- What skill levels do we want to target?
- How can we structure this course to allow for maximum interaction?
I’d like to go through each of these questions below (please bear with me, we will get to technical content eventually I swear!)
What do I want to teach?
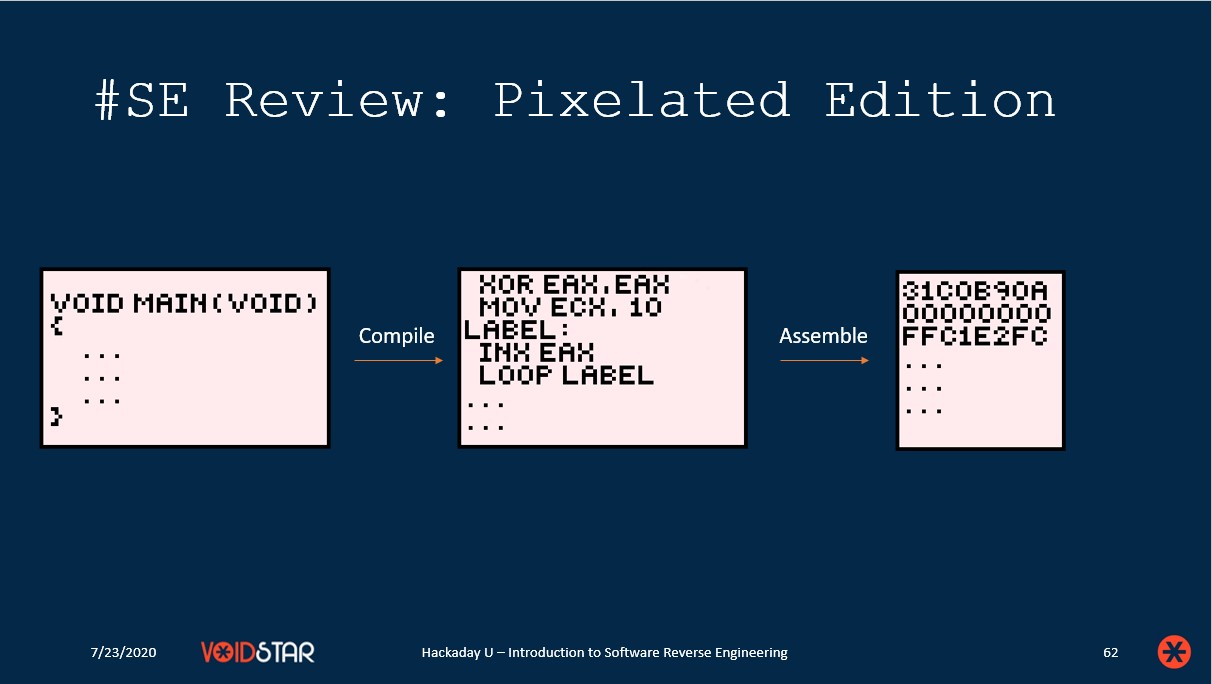
As most of you know from interacting with me on twitter and reading blog entries here, there is nothing that I enjoy more than pulling firmware off of devices and loading it into Ghidra. Originally I had considered a hardware course, however, since this was going to be my first fully virtual course I wanted to remove any margins for error and shipping hardware / ensuring everyone gets everything set up properly is quite a challenge. Once the initial hardware idea was ruled out, I looked around online for various Ghidra tutorials, and while there were many, this seemed like an area in which we could contribute to the community. There are plenty of great tutorials out there but not all of them are specifically designed for people with limited experience in the RE world. After reviewing the training materials that I already had produced for various private training courses and considering that the audience would have a fairly varied skill set and experience level, we decided to put together material focused on using Ghidra the open-source SRE suite provided by the NSA. The goals that I settled on were to teach students the fundamentals of SRE with Ghidra and to cover x86_64 assembly fundamentals as well, with the hope that after completing this course they would be comfortable opening ELF files in Ghidra and reviewing assembly code as well as the decompiler output.
What skill levels do we want to target?
Once I had decided on a Ghidra course - the next question to be answered was: what skill levels do we want students to have before taking this course? Given that one of the goals of Hackaday-U is inclusivity and accessibility, it only made sense that we would develop these materials under the assumption that the students had as few prerequisites as possible. This means that in addition to Ghidra, we also needed to cover a lot of other topics (from a high-level view of course):
- Computer Architecture
- The Compilation Process
- ELF Files
- x86_64 Instructions / ISA
This meant that at the very least one of the sessions would be dedicated to these concepts, to ensure that all of the students were starting from the same point. With all of this in mind, we decided that the appropriate pre-requisite was that the students be familiar with the concept of machine code (from a computer architecture perspective) and have some experience with C and a scripting language of some sort. Now that we had determined, the content and target skill level for students - the next thing to figure out (and probably the most important) was how do we structure this course such that people can get the most out of it remotely?
How can we structure this course for maximum interaction?
Given the current state of affairs with COVID-19 and everything else that is going on globally - many aspects of training and education are being re-evaluated. I have given private training courses in the past, typically onsite at company facilities or to internal attendees from various companies that I have worked for. Not being able to physically be in the same room as students can bring a lot of challenges (note that I am not some sort of pedagogical expert, I’ve just listed the few things I’ve noticed):
- It is hard to read the room and make note of students understanding of concepts (sometimes you can tell when students are lost/confused and can revisit material without pointing them out specifically)
- Students may have a difficult time paying attention in a virtual class as there are more distractions
- Engagement is generally lower in a webinar setting
- Debugging potential issues with their setup/workspace is much more difficult
Also, when I develop a course I like to focus on as many hands-on exercises and practical applications as possible. While lectures are great, I’ve found that the real value comes in exercising what you’re learning and getting feedback from these exercises. To try to properly illustrate the topics that were being taught and to increase engagement/interaction I developed 4 challenges for each session. Each of these challenges took the form of a typical “CrackMe” style exercise, where students were instructed to find a keycode or password.
The folks at Hackaday provided guidelines that had an “Office Hour” listed as part of the course content. This was something that both myself and the students found extremely useful. During these office hours, students were able to ask questions, and I was able to open up Ghidra with them in the session and walk through whatever questions were asked. This also allowed for students to comment on the content being covered thus far, and provide ideas for other things they would like to see.
We structured the course to have one hour of lecture, and one office hour once per week. I like this schedule because I feel that it gave the students time to review the content and exercises and then bring any questions that they might have to the office hour session later on that week. This structure helped us guarantee that students were still following along with the materials properly and that no-one was getting left behind. While I am sure that this was not perfect for everyone, I think having this staggered structure of a lecture followed by an office hour was extremely useful!
Lastly, I’ll note that I think breaking the sessions out into 1 or 2 hour-long segments was helpful as well. As someone who has both given and taken multiple training courses, it is sometimes difficult to maintain a good pace and attention levels. Breaking things up into smaller chunks, with relevant exercises and an office hour session seemed to make the materials more digestible for the students.
Finally, now that I have outlined what we wanted to do with this course and the challenges that we needed to overcome, I’ll get into the course details!
Course Overview
As stated before, the goals of this course are to introduce the core concepts behind software reverse engineering. After taking this course I wanted students to be comfortable with opening Ghidra, reading assembly and also have a grasp of the initial workflow when looking at an unknown binary.
Session One: What is Software Reverse Engineering … or Computer Architecture for that matter?
This session covered all of the pre-requisite topics that I mentioned in the sections above. We start by describing what software reverse engineering is, and why you might want to do it. Next, we go over how software is compiled from human-readable code into bytecodes that are interpreted by the CPU. Once the students have an understanding of how this machine code is generated, we review x86_64 architecture and cover some basic instructions. Lastly, we go over simple Ghidra usage and cover how to load and perform auto-analysis on a binary!
There was a lot to cover in this session and I think out of all of them, this one took the most time. However, given the feedback from the students that did not have a strong background in computer architecture or assembly language, I think that it was beneficial and was also fun for me to go back and review those concepts as well!
The Link for this lecture can be seen below:
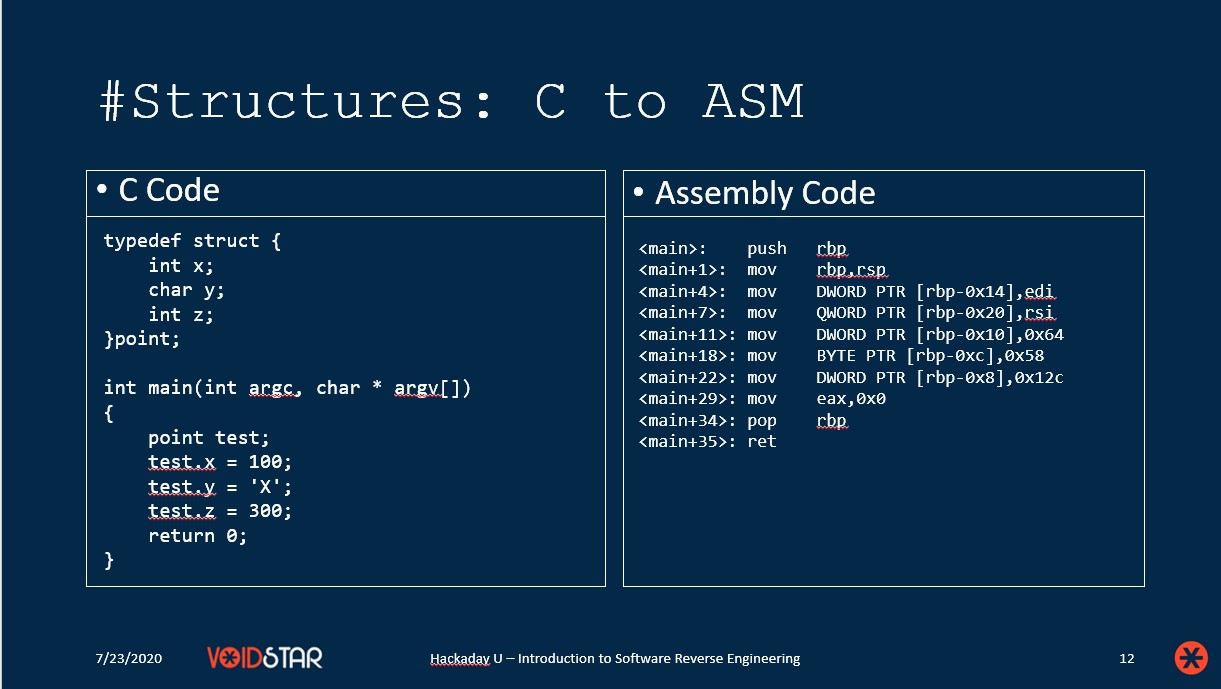
Session Two: C to Assembly - Identifying C constructs in Assembly language using Ghidra
Session two largely focuses on how various C constructs (or programming constructs in general) translate when compiled to assembly language. This includes things like:
- Control Flow
- Loops
- Switch Cases
- Function Calls
- Local / Global Variables
- Accessing Arrays and Array Manipulation
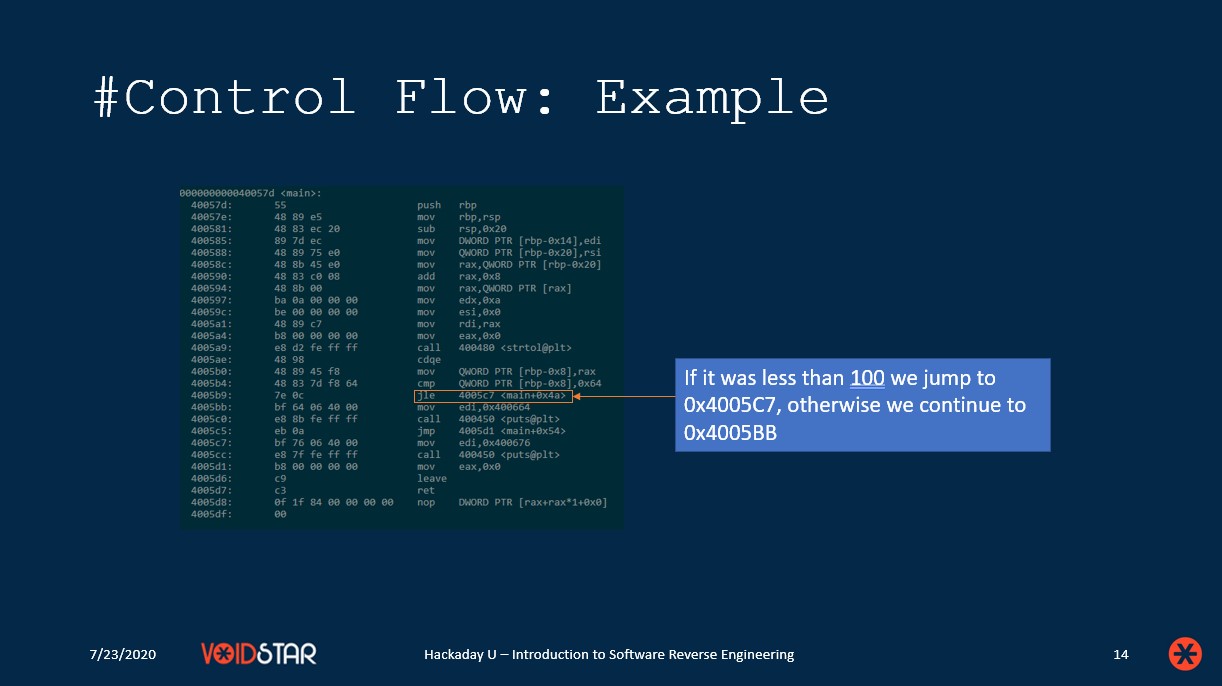
To cover all of these topics appropriately, we also cover the stack and the standard x86_64 calling convention. The bulk of this lesson is comprised of C code examples and comparing them with the resulting assembly. This was done to highlight how to interpret the assembly instructions covered in lesson one, and use that understanding to recreate the logic of a C program. Of course, with Ghidra a lot of this is done for you with the decompiler, but it is important to have a solid grasp of these fundamentals with performing RE.
During this lesson, we also go over how to enhance Ghidra decompilation output by modifying function signatures, applying data types to variables that are incorrectly typed, and creating arrays. We also review how to use the highlighting and slicing features to make the decompiled output more readable!
This session took a reasonable amount of time to put together, but I think it is one of the most technically dense and rewarding of the sessions. Learning how these constructs are created and identifying them in assembly is an extremely valuable skill and it was a lot of fun for me to attempt to explain how it all works.
You can find the youtube link for this lecture below:
Session Three: More C to Assembly
Session three follows the same theme as session two: C to assembly. During this lesson we covered how the following C constructs are represented at the machine code level:
- Structures
- Enums
- Pointers
- File Operations
For each of these, we reviewed a C code sample, and the resulting assembly. We also talk about various reverse engineering tools and the strengths and weaknesses of common tools. In addition to covering how all of these C constructs were represented in machine code, we also reviewed how to create each of them properly in Ghidra. This included:
- Structure Creation and Application
- Enum Creation
- Creating and Labelling Pointers
- Patching Binaries
- Ghidra’s Bookmarking System
- Searching for Instruction Patterns and Sequences in Ghidra
- Writing Comments in Ghidra
During this session, we also covered things like structure padding, and how to try to recreate structures based on the assembly generated.
One of the more useful things that we covered in this segment was Ghidra’s ability to search for instruction patterns. This was something that I was only partially familiar with, and I learned a lot by reviewing it and testing it on various binaries. It’s very useful when analyzing firmware and looking for certain instruction sequences that might interact with a peripheral in a particular way!
This session generated a lot of great questions that we covered during the office hour regarding how structures are padded and how to properly patch binaries in Ghidra. During the office hour, we demonstrated patching a flat firmware binary and talked about why patching ELF/EXE files does not currently work in Ghidra.
Session 3’s edited video can be seen below:

Session Four: Ghidra Features
A lot of what we covered in class were fundamentals of reverse engineering, and how to apply these fundamentals using Ghidra. During the final session I wanted to focus solely on Ghidra, covering how it works (from a high level) and other features that I find useful.
During this session we covered:
- Loading External Libraries
- Patch Analysis and Diffing
- Checksum Generation
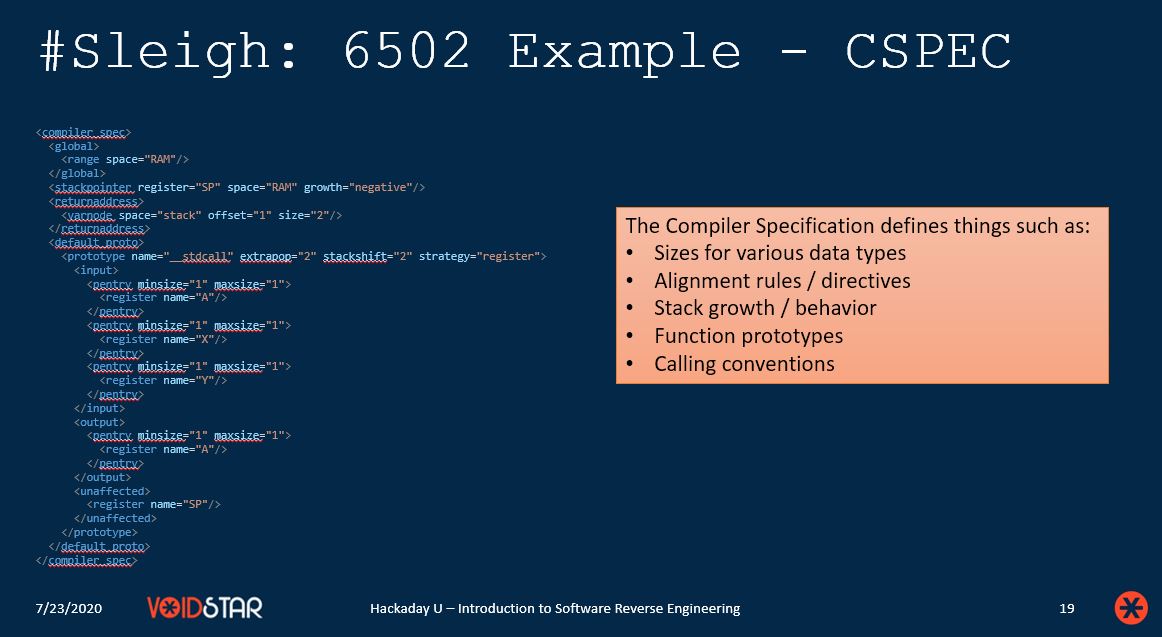
- P-Code and SLEIGH
- Ghidra Extensions / Setting up a development environment
Each of these topics was very fun to teach and prepare material for, but given that our sessions are only an hour-long - we cover only the basics of each. Ghidra’s patch analysis alone deserves a full session if not more. If you are often comparing similar binaries/patch diffing, I would highly recommend giving it a shot if you haven’t already.
PCode and SLEIGH were covered as well - this was because students had a lot of questions about how the disassembler and decompiler worked, and to understand that, one must understand SLEIGH and PCode. SLEIGH is used to model the processor and is also used to parse the various fields of a binary instruction and display the resulting assembly. PCode is the language that is used to represent what the instruction actually does. PCode is a register transfer language, whose elements are defined by the SLEIGH specification for a particular processor. The PCode is used to emulate what a given instruction does - and by analyzing this PCode, the decompilation is produced. These two topics deserve an entire course on their own and we barely scratched the surface, but I wanted to cover it so that the students had an understanding of how things were structured in Ghidra.
Lastly, we reviewed how to set up Eclipse for extension development and went through some example API calls that I found helpful when I was learning how to write Ghidra scripts.
Session 4’s edited video can be seen below:

Final Thoughts
If this course seems like something you would be interested in, check out the project page and the github repository. I try to check the project page on hackaday.io regularly for questions and provide help when I can.
I am grateful for this opportunity to work with Hackaday. I think that it’s important to review the fundamentals of RE, and teaching this course required me to be prepared to answer lots of interesting questions that I hadn’t considered. Throughout the course, we learned a lot about what works and what doesn’t when teaching a course such as this remotely. The office hours were extremely useful for those who needed the time, and having exercises to work on when not in class seemed to help people properly digest the material. I also think that spreading out the sessions and not teaching for 8 hours straight assisted with the attention span of the students and their ability to stay focused and ask good questions.
There are more courses in the works for HackadayU and I am hoping to continue to be a part of it moving forward.
I am also looking forward to offering more private training courses through VoidStar where we will be offering more advanced and targeted courses for those who are interested. We have a hardware hacking course coming up for those who are interested!
If this course seems like something you would be interested in, check out the project page and the github repository. I try to check the project page on hackaday.io regularly for questions and provide help when I can.
Finally - if there is something you would like to see covered in a course, or if you have any questions about the materials at all, please feel free to reach out to me on twitter!.
Blog Updates (as of 2022):
- Future blog posts and entries can be found here.
- If you are interested in learning more about reverse engineering check out my 5 day hardware hacking course, public and private offerings are available upon request
- Never want to miss an update or blog post? Check out my mailing list for a quarterly newsletter about reverse engineering embedded devices